How to Attach a Smartphone to a Telescope

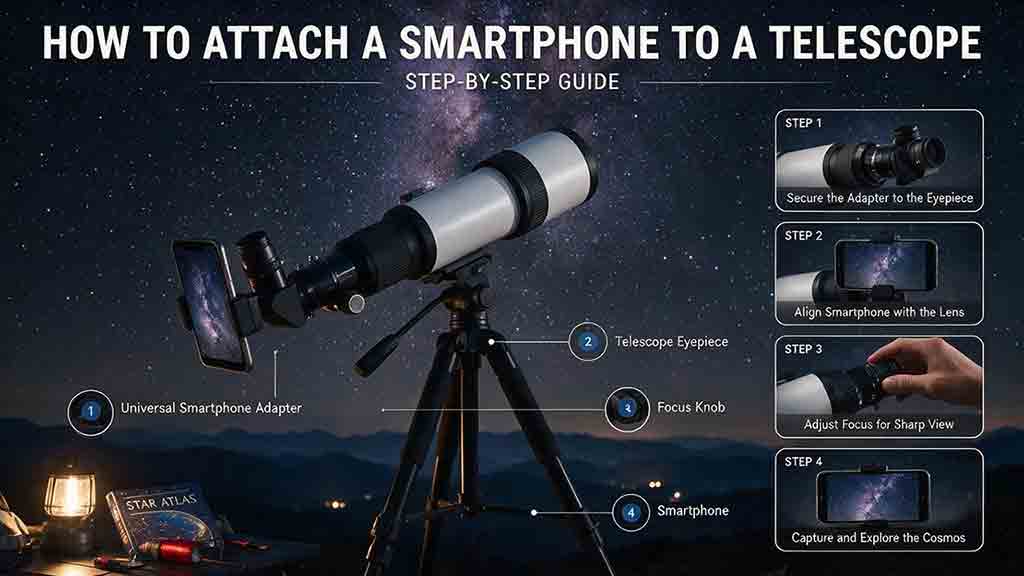
How to Attach a Smartphone to a Telescope
To attach a smartphone to a telescope, use a compatible afocal adapter that grips the phone and a rigid section of the eyepiece. Center the phone’s active camera over the eyepiece, attach the assembly while supporting its weight, rebalance the telescope, and adjust sideways position and camera-to-eyepiece distance until the full circular field appears. Start with a low-power eyepiece.
Key Takeaways
- Check phone size, case thickness, camera position, eyepiece outside diameter, and adapter load before buying or attaching anything.
- Align the phone’s active camera with the eyepiece exit pupil; a black circle or crescent usually indicates incorrect centering or spacing.
- Start with a low-power eyepiece because the wider field and larger exit pupil make attachment, focus, and tracking easier.
- Support the phone during installation, secure every clamp, and rebalance the telescope before releasing the assembly.
- Lock focus and exposure when possible, then use a timer, remote shutter, or short video to reduce touch vibration.
This guide explains adapter types, compatibility, eyepiece selection, safe installation, three-axis alignment, telescope balance, camera setup, target-specific recommendations, troubleshooting, and a complete pre-capture checklist.
Editorial note: This guide is based on current manufacturer instructions, NASA smartphone-astrophotography guidance, and practical compatibility criteria rather than hands-on testing of a specific phone, adapter, eyepiece, or telescope.
What Does It Mean to Attach a Smartphone to a Telescope?
Most smartphone telescope photography uses afocal imaging: the telescope forms an image through an eyepiece, and the phone camera photographs that eyepiece image.
The smartphone keeps its own camera lens. The adapter does not usually replace the phone lens with the telescope; it holds the phone at the correct position behind the eyepiece.
Three terms make the process easier to understand:
- Exit pupil: the small beam of light leaving the eyepiece.
- Eye relief: the distance behind the eyepiece where the full field is available.
- Vignetting: darkening or blockage around the image, often seen as a black circle or crescent.
The main attachment task is to place the phone camera’s entrance pupil in the eyepiece’s exit pupil while keeping both devices rigid and square to each other.
What Is the Fastest Safe Attachment Method?
Use a purpose-built smartphone-to-eyepiece adapter, prepare the phone and eyepiece separately, then attach the aligned assembly while supporting the phone.
Quick attachment sequence
- Set up and balance the telescope without the phone.
- Insert a low-power eyepiece and focus the target visually.
- Confirm the adapter fits the phone and eyepiece.
- Secure the phone in the adapter away from the telescope.
- Select the intended phone camera.
- Center that camera over the adapter opening.
- Support the phone-and-adapter assembly with one hand.
- Clamp the adapter to a rigid eyepiece section.
- Adjust horizontal, vertical, and distance alignment.
- Rebalance the telescope and test mount motion.
- Refocus, reduce exposure, and capture with a timer or video.
- Support the phone again before loosening any clamp.
The exact installation order varies by adapter. Follow the current manufacturer instructions when they specify attaching the adapter to the eyepiece before inserting the phone.
Which Smartphone Telescope Adapter Should You Choose?
Choose the simplest adapter that fits the exact phone and eyepiece securely while providing enough adjustment to center the active camera.
| Adapter type | Main advantage | Main limitation | Best fit |
|---|---|---|---|
| Basic universal clamp | Low cost and few controls | Re-centering can be slow; limited distance adjustment | Occasional Moon photos with a simple phone |
| Two-axis platform adapter | Easier left-right and up-down alignment | Camera-to-eyepiece spacing may remain difficult | Phones with one easily positioned camera |
| Three-axis adapter | Adjusts horizontal, vertical, and distance position | Heavier, larger, and usually more expensive | Multi-camera phones and frequent use |
| Eyepiece-specific adapter | Rigid and repeatable fit | Limited to compatible eyepieces or adapter rings | Owners of a supported eyepiece system |
| Binocular or spotting-scope adapter | May work across several optical devices | Clamp range and balance vary | Users sharing one adapter among optics |
| Improvised or DIY holder | Can be inexpensive and customized | Safety, rigidity, repeatability, and phone retention are uncertain | Experienced builders who can verify every load path |
Celestron’s current Basic Smartphone Adapter page lists compatibility with eyepieces having an outside diameter from 29 mm to 45 mm, but that range applies to that specific product rather than every universal adapter.Celestron
Tele Vue’s FoneMate documentation uses an eyepiece-specific interface and recommends compatible eyepieces that are more likely to show a well-illuminated field.Tele Vue These examples demonstrate why “universal” and “eyepiece-specific” adapters require different compatibility checks.
When is a three-axis adapter worth it?
A three-axis adapter is useful when:
- The phone has cameras far from the center
- The active camera changes between modes
- The eyepiece has long eye relief
- The phone needs precise distance adjustment
- Different phones share the telescope
- Different eyepieces are used frequently
- Vignetting is difficult to remove
- Repeatable video capture matters
Celestron describes its NexYZ adapter as using X, Y, and Z adjustments to position the phone over the eyepiece and alter its distance from the eyepiece.Celestron
Should you make a DIY adapter?
A DIY adapter is reasonable only when it:
- Retains the phone against a real drop load
- Grips a rigid eyepiece surface
- Cannot contact optical glass
- Does not press phone buttons
- Does not obstruct the focuser
- Cannot rotate unexpectedly
- Allows controlled alignment
- Does not overload the mount or diagonal
Rubber bands, loose tape, handheld brackets, and unstable 3D-printed joints can fail suddenly. Do not place an expensive phone over a hard surface until the assembly has been tested close to the ground.
How Do You Check Compatibility Before Attaching the Phone?
Measure both the phone and eyepiece, then verify the complete mechanical path from phone clamp to telescope mount.
Smartphone compatibility
Check:
- Phone width and height
- Phone thickness
- Camera-bump depth
- Camera location
- Case thickness
- Side-button position
- Foldable-phone hinge position
- Lens-protector thickness
- Total phone weight
- Whether the clamp covers the screen controls
- Whether the camera app can select a fixed camera module
A large battery case or folio case may exceed the adapter’s clamp capacity. Celestron notes that some large cases need to be removed for its NexYZ adapter.Celestron
Remove a case only when necessary and when the bare phone can be retained safely. Do not peel off a bonded camera-lens protector during an observing session; inspect it for scratches, oil, or reflections instead.
Eyepiece compatibility
Check:
- Outside housing diameter
- Available rigid clamping length
- Tapered or straight housing
- Rotating eyeguard
- Rubber eyecup
- Zoom ring
- Focus ring
- Eye relief
- Eyepiece weight
- Barrel size
- Whether the adapter blocks the eyepiece lock
- Whether the eyepiece can still seat fully
Do not clamp onto:
- A soft rubber eyecup
- A rotating eye guard
- A zoom ring
- A focus ring
- A sharply tapered decorative section
- A loose upper housing
The clamp should hold a structural section that cannot rotate independently.
Telescope and mount compatibility
Check:
- Focuser load capacity
- Diagonal retention
- Eyepiece compression ring
- Visual-back security
- Dobsonian balance
- Mount clutch strength
- Tripod stability
- Clearance near the mount
- Cable routing
- Whether the phone can strike a tripod leg or mount head
A secure phone clamp is not enough if the diagonal rotates or the eyepiece holder slips.
Which Eyepiece Is Best for Attaching a Smartphone?
Start with a low-power eyepiece that has a stable housing, comfortable eye relief, and a field wide enough to make alignment easy.
Why low power works better
Telescope magnification is:
Telescope focal length ÷ eyepiece focal length
For a telescope with a 1,200 mm focal length:
- 25 mm eyepiece: 48×
- 15 mm eyepiece: 80×
- 10 mm eyepiece: 120×
The 25 mm eyepiece is usually the easiest starting point because it provides:
- Wider true field
- Slower target drift
- Brighter image
- Larger exit pupil
- Less visible vibration
- Easier phone alignment
- More forgiving focus
Move to moderate power only after the phone is centered, the telescope is balanced, and a sharp image has been recorded.
Does long eye relief help?
Moderate or long eye relief often gives the phone camera more space to see the full field without touching the eye lens.
However, very long eye relief can make alignment sensitive to sideways movement. The best eyepiece is not necessarily the one with the largest eye-relief number; it is the one that produces a stable, well-illuminated field with the chosen phone and adapter.
Should you use a Barlow lens?
Do not begin with a Barlow.
A Barlow may:
- Increase image scale
- Require more accurate alignment
- Magnify vibration
- Narrow the usable field
- Make target drift faster
- Increase focuser load
- Require more exposure
Add a Barlow only after the basic low-power setup works. A shorter eyepiece is not automatically better than a Barlow; compare sharpness, balance, and tracking.
How Do You Identify the Active Smartphone Camera?
Select the intended camera in a well-lit environment before mounting the phone, and confirm that the camera app does not switch modules after the telescope image becomes dark.
Multi-camera phones may include:
- Main wide camera
- Ultra-wide camera
- Short telephoto camera
- Long telephoto camera
- Depth sensor
- Laser or autofocus sensor
- Flash
- Microphone
- Additional computational sensors
A displayed 1×, 2×, or 5× label does not guarantee that a particular physical lens remains active. In low light, the phone may crop the main camera or combine several cameras.
Safe camera-identification method
- Open the camera app in a well-lit room.
- Select the intended native lens step.
- Compare the on-screen field of view while changing camera selections.
- Consult the phone’s official camera diagram or manual.
- Note the physical position of the selected camera.
- Lock the lens choice in the app when supported.
- Recheck after attaching the phone.
Do not tape over other cameras, sensors, microphones, flashes, or depth modules unless the manufacturer documents that the selected mode does not use them.
Which camera should you choose?
The main camera is usually the easiest starting choice because:
- Its lens is often easier to align
- It commonly receives strong low-light processing
- It may have a larger sensor
- It is less sensitive to target drift than a long telephoto camera
The phone’s telephoto camera may provide more image scale, but the telescope already provides magnification. A telephoto module can make vignetting, focus, motion, and automatic lens switching harder.
Compare the saved files rather than assuming more phone zoom produces more telescope detail.
How Do You Attach the Smartphone Step by Step?
Step 1: Prepare the telescope without the phone
Focus and balance the telescope visually before adding the adapter.
- Set up the telescope according to its manual.
- Confirm the tripod, base, clutches, and locks are secure.
- Insert the chosen low-power eyepiece fully.
- Tighten the eyepiece holder correctly.
- Center a bright target.
- Focus visually.
- Check Newtonian collimation when relevant.
- Allow the telescope to approach outdoor temperature.
- Learn the target’s drift direction if the mount does not track.
- Confirm the eyepiece does not rotate or slip.
The Moon is the easiest first target because it is bright, large, and easy to center. Jupiter and Saturn require more precise exposure, focus, and tracking.
Step 2: Prepare the phone and adapter
Secure the phone before the assembly is placed over the telescope.
- Clean the external camera cover with a lens-safe method.
- Remove loose grit before wiping.
- Remove a bulky case only if required.
- Place the phone in the adapter.
- Position the clamp away from side buttons.
- Tighten the phone clamp evenly.
- Verify the phone cannot slide.
- Select the intended camera.
- Open the camera app.
- Reduce screen brightness enough for comfortable night use.
Hold the adapter close to a padded surface and gently change its orientation. The phone should remain secure without relying on friction from one small point.
Step 3: Pre-align the phone camera
Center the active camera over the adapter opening before attaching the adapter to the eyepiece.
Look through the adapter opening from the eyepiece side. The selected physical camera should appear centered.
For a two-axis or three-axis adapter:
- Use horizontal adjustment for left-right movement
- Use vertical adjustment for up-down movement
- Leave distance adjustment near a middle position initially
Do not allow the phone camera cover to touch a metal adapter edge.
Step 4: Attach the adapter to the eyepiece
Support the phone’s full weight while securing the eyepiece clamp.
- Hold the phone-and-adapter assembly with one hand.
- Place the adapter around the approved rigid eyepiece section.
- Confirm the eyepiece remains fully inserted.
- Tighten the adapter clamp gradually.
- Tighten opposing screws evenly when applicable.
- Confirm the adapter does not press the eyepiece lock.
- Confirm the diagonal has not rotated.
- Keep supporting the phone during the first movement test.
Do not overtighten plastic eyepiece housings, rotating eyeguards, or thin adapter parts.
Some adapter designs specify attaching the adapter to the eyepiece first. In that case, follow the product instructions while supporting every unsecured component.
Step 5: Find and center the exit pupil
Adjust the phone until the camera sees a bright, centered circular field.
With the camera app open:
- Point the telescope at the centered bright target.
- Move the phone left or right until light appears.
- Move the phone up or down to center the circle.
- Adjust phone-to-eyepiece distance.
- Enlarge the visible field without touching glass.
- Tighten each adjustment gradually.
- Recheck the field after every clamp is tightened.
A black crescent means the phone camera is off-center. A small complete circle often means the camera is too far from or otherwise poorly matched to the eyepiece’s eye-relief position.
Tele Vue notes that vignetting varies with the eyepiece and camera pupil position, so results can differ by phone and zoom setting.Tele Vue
Step 6: Rebalance the telescope
The phone changes the telescope’s center of gravity, so test balance before releasing the assembly.
Dobsonian telescope
The phone can make the eyepiece end fall downward.
Possible solutions:
- Increase approved altitude tension
- Move a magnetic counterweight when the tube permits it
- Use a manufacturer-approved balance aid
- Rotate the optical tube when the mount design permits it
- Choose a lighter adapter or phone
- Return to a lighter eyepiece
Do not attach an unsecured counterweight that can slide or fall.
Equatorial or alt-azimuth mount
Check:
- Tube balance in its normal axes
- Clutch holding force
- Tripod stability
- Cable movement
- Clearance near the mount
- Whether the phone crosses the center of gravity during slewing
Support the telescope while first releasing or adjusting a clutch.
Diagonal-equipped refractor or catadioptric telescope
A phone can rotate a star diagonal in the visual back.
Confirm:
- Visual-back threads or clamp are secure
- Diagonal barrel is fully inserted
- Compression ring is tightened
- Eyepiece is secure in the diagonal
- Adapter cannot hit the focuser or mount
A rotating diagonal can drop the entire phone, adapter, and eyepiece even when the phone clamp itself is secure.
Step 7: Focus the telescope and phone
Focus the telescope first, then lock or refine the phone focus.
- Use the telescope focuser to sharpen the target.
- Keep the target near the center.
- Tap the target on the phone screen.
- Lock focus and exposure when supported.
- Use manual distant focus when autofocus hunts.
- Recheck focus after changing eyepieces or phone cameras.
- Wait for vibration to settle before judging sharpness.
Apple documents focus and exposure controls, including AE/AF locking on supported devices, but menus and behavior depend on the model and software version.Apple Support
The phone can focus on:
- Eyepiece dust
- A reflection
- The field stop
- A bright lunar edge
- The target itself
A target that looks sharp to the eye may still require phone-focus adjustment.
Step 8: Set exposure and capture
Reduce exposure for the Moon and bright planets, then trigger the shutter without touching the telescope.
Use:
- Short timer
- Bluetooth remote when supported
- Wired shutter when supported
- Voice command when appropriate
- Short video with locked focus and exposure
NASA notes that a smartphone adapter can help hold a phone at a telescope eyepiece for photos and video.NASA Science
For the Moon:
- Turn off flash
- Lower exposure until surface details appear
- Use standard Photo or manual mode before a long Night mode
- Take several frames
- Record short video for frame selection
For Jupiter and Saturn:
- Begin at low or moderate telescope power
- Lower exposure enough to preserve the planetary disk
- Lock focus and exposure
- Record short video
- Recenter between clips on a manual mount
For bright stars or double stars:
- Avoid excessive digital zoom
- Use short exposures
- Refocus carefully
- Keep the star near the center
- Compare several frames
How Can You Prevent the Phone From Falling?
Treat the phone, adapter, eyepiece, diagonal, focuser, and mount as one load chain; every connection must remain secure.
Load-chain checklist
- Phone retained by adapter
- Adapter retained by eyepiece
- Eyepiece retained by holder
- Diagonal retained by visual back, if used
- Focuser supports total off-axis load
- Optical tube remains balanced
- Mount holds position
- Tripod or base remains stable
A safety tether can provide backup only when:
- The adapter or phone maker permits it
- The anchor is strong
- The tether cannot pull the telescope over
- The tether cannot enter the mount
- The tether has enough slack for normal movement
- The phone cannot swing into the optics
Do not leave the phone-and-adapter assembly unattended.
Safe first test
Test attachment:
- Indoors or in daylight
- Over a padded surface
- At low telescope altitude
- Without slewing rapidly
- With one hand supporting the phone
- Before using an expensive eyepiece
Never use the Sun as a daytime alignment target.
What Are the Pros and Cons of Smartphone Telescope Adapters?
Advantages
- Lower cost than a dedicated astronomy camera
- Uses equipment many people already own
- Easy sharing of lunar and planetary images
- Useful for outreach and accessibility
- Video capture supports frame selection
- Adapter can work with several optical devices
- No need to remove the phone camera lens
Limitations
- Alignment can be slow
- Multi-camera phones may switch lenses
- Vignetting varies by phone and eyepiece
- Phone weight changes telescope balance
- Manual mounts require frequent recentering
- Automatic processing may alter detail
- High magnification amplifies vibration
- Large cases and camera bumps may not fit
- The complete system can rotate or slip
- Deep-sky performance remains limited on many setups
A smartphone adapter is a practical entry point, not a guarantee of professional astrophotography results.
Which Setup Works Best for Different Targets?
| Target | Starting eyepiece | Capture method | Main challenge |
|---|---|---|---|
| Full Moon | Low power | Several stills or short video | Exposure and full-disk alignment |
| Lunar crater detail | Moderate power after low-power setup | Short video | Focus, seeing, drift, vibration |
| Jupiter | Low to moderate power | Video | Small disk and highlight control |
| Saturn | Moderate power after alignment | Video | Focus and tracking |
| Bright star or double star | Moderate power | Short stills or video | Focus and atmospheric seeing |
| Daytime terrestrial target | Low power, safely away from Sun | Still photo | Heat shimmer and color |
| Deep-sky object | Lowest useful power | Model-dependent Night or video workflow | Faint signal and tracking |
A manual Dobsonian is often easiest with short lunar or planetary video clips. A tracking mount reduces drift but does not correct poor alignment, focus, or balance.
A Decision Framework for Choosing an Adapter
Use these five questions.
1. Does the adapter fit the phone?
Verify dimensions, weight, camera position, case, and side buttons.
2. Does it fit the eyepiece?
Verify housing diameter, rigid clamping area, eye relief, and rotating parts.
3. Does it provide enough adjustment?
A centered single-camera phone may need only two axes. A large multi-camera phone may benefit from three axes.
4. Can the telescope carry the load?
Check the focuser, diagonal, mount, balance system, and tripod.
5. Will the adapter be used frequently?
Occasional Moon photos may justify a basic clamp. Repeated lunar and planetary video often benefits from faster, repeatable alignment.
| User situation | Practical adapter choice |
|---|---|
| First Moon photo with a small phone | Basic universal clamp |
| Multi-camera phone with offset lenses | Three-axis adapter |
| Frequent imaging with one eyepiece family | Eyepiece-specific adapter |
| Shared family phones | Adjustable universal three-axis adapter |
| Heavy phone on a small telescope | Lightweight adapter after load verification |
| Large 2-inch eyepiece | Adapter specifically rated for that housing |
| Manual Dobsonian | Rigid adapter plus balance solution |
| Outreach with repeated phone changes | Fast-adjusting three-axis platform |
Real-World Attachment Examples
The following examples are practical workflows rather than reports from tested products.
Example 1: Full Moon through an 80 mm refractor
Equipment:
- 80 mm refractor
- Stable alt-azimuth mount
- Star diagonal
- 25 mm eyepiece
- Universal adapter
- Smartphone main camera
Workflow:
- Center and focus the Moon visually.
- Confirm the diagonal and eyepiece are secure.
- Mount and pre-align the phone.
- Attach the adapter while supporting the phone.
- Center the exit pupil.
- Recheck diagonal rotation.
- Lower exposure until lunar detail appears.
- Use a timer and capture several frames.
Likely result: a manageable whole-disk image with relatively easy alignment.
Example 2: Jupiter through an 8-inch Dobsonian
Equipment:
- 8-inch Dobsonian
- Low-power eyepiece for setup
- Moderate-power eyepiece for capture
- Three-axis adapter
- Smartphone video mode
Workflow:
- Collimate and cool the telescope.
- Align the phone at low power.
- Test Dobsonian balance.
- Center Jupiter and lock exposure.
- Change to moderate power only if the mount remains controlled.
- Watch the drift direction.
- Place Jupiter near the opposite side of the field.
- Record a short video as it drifts through the center.
- Recenter and repeat.
Likely result: a small planetary disk suitable for frame selection, with tracking and exposure as the main difficulties.
Example 3: Large phone and heavy eyepiece on an SCT
Equipment:
- Schmidt-Cassegrain telescope
- Star diagonal
- Large eyepiece
- Large smartphone
- Heavy three-axis adapter
Workflow:
- Verify the visual back and diagonal load.
- Confirm the eyepiece clamp can hold the adapter.
- Test the assembly close to horizontal over a padded surface.
- Rebalance the mount.
- Slew slowly through the planned range.
- Check that the phone cannot strike the fork, mount, or tripod.
- Reduce the load if any joint rotates.
Likely result: a workable setup only when every connection in the load chain remains secure.
Why Is There a Black Circle Around the Image?
The phone camera is not correctly placed in the eyepiece exit pupil, or the camera-to-eyepiece distance is wrong.
Try this order:
- Confirm the intended phone camera is active.
- Start with a low-power eyepiece.
- Loosen only the alignment controls.
- Move left and right.
- Move up and down.
- Adjust distance from the eyepiece.
- Recenter the telescope target.
- Tighten gradually.
- Recheck after tightening.
A complete circular image that remains small may be limited by the eyepiece-camera combination rather than a simple centering error.
Why Does the Image Disappear When the Clamp Is Tightened?
Possible causes:
- Adapter shifts during tightening
- Eyepiece eyeguard rotates
- Phone slides in the clamp
- Diagonal rotates
- Camera app switches lenses
- Distance adjustment changes
- Telescope target drifts
Tighten each connection in small steps while watching the screen. Recheck the active camera and use a rigid eyepiece clamping section.
Why Is the Image Blurry?
Blur can come from focus, vibration, atmosphere, dew, optical alignment, excessive magnification, or phone processing.
Troubleshooting sequence:
- Return to a low-power eyepiece.
- Refocus visually.
- Refocus or lock the phone.
- Use a timer.
- Check for camera-cover smears.
- Check the eyepiece for dew.
- Recenter the target.
- Confirm reflector collimation.
- Allow the telescope to stabilize thermally.
- Compare still photo and short video.
Do not judge sharpness while touching the focuser or adapter.
Why Does the Phone Keep Switching Cameras?
The phone’s software may respond to low light, zoom, focus distance, blocked sensors, or the selected capture mode.
Try:
- Use the main camera
- Select a native lens step
- Disable automatic macro or lens switching when the phone officially provides that option
- Use a camera app with documented fixed-lens control
- Avoid arbitrary hybrid zoom
- Recheck after changing modes
- Remove an incompatible case
- Keep other sensors unobstructed
Phone controls vary by model and software version. Use the current official manual for the exact phone.
Why Does the Telescope Fall or Drift After the Phone Is Attached?
The phone changed the telescope’s balance or exceeded the holding force of a clutch, bearing, focuser, or diagonal.
Immediate action:
- Support the phone.
- Return the telescope to a safe position.
- Tighten only the approved tension or clutch control.
- Rebalance according to the mount manual.
- Reduce adapter, eyepiece, or phone weight.
- Confirm the base or tripod remains stable.
Do not compensate for severe imbalance by overtightening a small plastic clutch.
Why Can the Telescope No Longer Reach Focus?
Possible causes:
- Eyepiece was moved during attachment
- Diagonal is not seated
- Focuser lock is engaged
- Phone autofocus is wrong
- Telescope focus changed after switching eyepieces
- Barlow or extension was added
- The camera is aligned with the wrong phone lens
Afocal attachment normally does not change the telescope’s required visual focus dramatically because the eyepiece remains in place. Refocus the telescope visually first, then reinstall the phone.
Why Are There Reflections or Ghost Images?
Possible causes:
- Phone camera protector
- Dirty camera cover
- Eyepiece reflections
- Streetlight entering the optical path
- Gap between phone and eyepiece
- Bright screen reflection
- Lens coating limitations
- Misaligned phone camera
Shield nearby stray light without blocking ventilation or sensors. Avoid pressing dark fabric against moving mount parts.
What Attachment Mistakes Should You Avoid?
| Mistake | Why it causes problems | Better approach |
|---|---|---|
| Starting with high power | Narrows the field and magnifies vibration | Align at low power first |
| Clamping to a rubber eyecup | Eyepiece can rotate or slip | Use a rigid housing section |
| Releasing the phone before load testing | Complete assembly may rotate or fall | Support and test every connection |
| Ignoring telescope balance | Tube can drift or mount can strain | Rebalance after attachment |
| Using maximum phone zoom | Increases cropping and alignment difficulty | Use a native camera step |
| Covering unused phone cameras | May block sensors used by the app | Select the camera through software |
| Letting the lens touch the eyepiece | Risks scratching both optical surfaces | Maintain controlled spacing |
| Tightening every knob excessively | Can damage plastic housings or threads | Tighten only enough to prevent motion |
| Using a rotating eyeguard as the clamp point | Alignment changes under load | Clamp a fixed structural section |
| Forgetting diagonal security | Entire assembly can rotate downward | Verify the full load chain |
| Touching the screen during capture | Adds vibration | Use a timer, remote, or video |
| Leaving the assembly unattended | A mount or clamp can move unexpectedly | Remove or supervise the phone |
| Searching for a daytime target near the Sun | Creates severe eye and equipment risk | Avoid unfiltered solar proximity |
Smartphone-to-Telescope Attachment Checklist
Before buying an adapter
- Phone dimensions checked
- Phone weight checked
- Camera position checked
- Case thickness checked
- Side-button location checked
- Eyepiece outside diameter measured
- Rigid clamping area identified
- Eye relief reviewed
- Adapter adjustment axes understood
- Focuser and diagonal load considered
- Mount balance solution planned
- Return and compatibility terms checked
Before attachment
- Telescope assembled securely
- Mount stable
- Low-power eyepiece installed
- Target centered and focused visually
- Reflector collimation checked
- Phone camera cover clean
- Correct camera selected
- Phone secured in adapter
- Clamp avoids phone buttons
- Adapter controls move smoothly
During attachment
- Phone weight supported
- Adapter clamped to rigid eyepiece section
- Eyepiece remains fully seated
- Diagonal remains secure
- Camera centered horizontally
- Camera centered vertically
- Camera distance adjusted
- Full field checked
- All knobs tightened gradually
- Telescope rebalanced
- Mount moved slowly through safe range
Before capture
- Focus refined
- Exposure adjusted
- Focus locked when possible
- Exposure locked when possible
- Flash off
- Digital zoom minimized
- Timer or remote ready
- Target drift direction known
- Phone cannot strike the mount
- Assembly remains supervised
After capture
- Phone supported before loosening clamps
- Adapter removed without twisting the eyepiece
- Eyepiece and diagonal checked
- Phone and equipment dried if damp
- Original files preserved
- Telescope returned to visual balance
- Dust caps replaced after equipment dries
How We Developed This Attachment Framework
This guide uses six practical principles:
- Compatibility before purchase: phone, adapter, eyepiece, focuser, and mount must work as one system.
- Low power before high power: a wider field reduces alignment and tracking difficulty.
- One complete load chain: every clamp from phone to tripod must remain secure.
- Three-dimensional alignment: horizontal, vertical, and distance errors can each cause vignetting.
- Balance after attachment: the phone changes the telescope’s center of gravity.
- Repeatable capture: focus, exposure, camera selection, and target position should remain stable.
No specific phone, adapter, eyepiece, telescope, mount, or camera app was hands-on tested for this guide.
What Should You Do Next?
For a first attachment, use the Moon, a low-power eyepiece, the phone’s main camera, and a secure adapter. Complete the alignment and balance checks before increasing magnification.
For repeated lunar and planetary video, consider a three-axis adapter when a basic clamp cannot maintain camera centering or distance.
For a manual Dobsonian, prioritize low weight, controlled altitude movement, and short video clips. For a diagonal-equipped telescope, treat diagonal rotation as a primary safety check.
The correct setup is the one that holds the phone securely, shows a centered field, keeps the telescope balanced, and can be removed without placing optical surfaces or equipment at risk.
Frequently Asked Questions
Can you hold a smartphone over a telescope eyepiece without an adapter?
You can record a quick image by hand, but alignment, spacing, vibration, and phone safety are difficult to control. A secure adapter is strongly preferred for repeatable photos or video and reduces the chance of contacting or dropping the phone onto the eyepiece.
Does a smartphone adapter fit every telescope eyepiece?
No. Compatibility depends on the eyepiece’s outside diameter, housing shape, rigid clamping area, eye relief, rotating parts, and adapter range. Measure the exact eyepiece rather than relying only on its 1.25-inch or 2-inch barrel size.
Which phone camera should be aligned with the eyepiece?
Start with the main camera unless the exact phone and app reliably hold another camera module. The telescope already supplies image scale, while a phone telephoto camera can increase vignetting, motion sensitivity, and automatic module switching.
Why can I see the target with my eye but not on the phone?
The phone camera is probably outside the eyepiece exit pupil, aligned with the wrong camera, or too near or far from the eyepiece. Begin with low power and adjust left-right, up-down, and distance until a bright circular field appears.
Can a smartphone damage a telescope focuser or diagonal?
The phone itself may not, but the combined off-axis load of the phone, adapter, and eyepiece can rotate a diagonal, slip an eyepiece, strain a light focuser, or unbalance the mount. Verify the complete load path and reduce weight when any connection moves.
Is a three-axis smartphone adapter necessary?
No. A basic adapter can work for occasional Moon images when the phone camera is easy to center. Three-axis adjustment is useful for offset multi-camera phones, changing eyepieces, long eye relief, repeated imaging, and stubborn vignetting.
Sources
Sources were checked August 19, 2026.
- Celestron — Basic Smartphone Adapter, 1.25-Inch
- Tele Vue — FoneMate Smartphone Adapter Instructions
- Celestron — NexYZ 3-Axis Universal Smartphone Adapter
- Tele Vue — FoneMate Smartphone Adapter
- Apple Support — Use the Camera Control on iPhone
- NASA Science — Astrophotography With Your Smartphone
- NASA Science — A Guide to Smartphone Astrophotography
- NASA — Guide to Smartphone Astronomy
- Google — Pixel Camera Help
- Celestron — Smartphone Adapter DX Kit, 1.25-Inch
- Celestron — NexGO Universal Smartphone Adapter
- Sky-Watcher — Product Manual Library
More from Smartphone Astrophotography
How to Take Moon Photos With a Smartphone
Clear smartphone Moon photos depend on real image scale, stable support, accurate focus, and reduced exposure rather than maximum digital zoom or a long Night-mode capture. This guide explains how to photograph the Moon with a phone alone, on a tripod, or through a telescope eyepiece using an afocal smartphone adapter. Readers learn how lunar phase and the terminator affect visible detail, how to choose between optical and digital zoom, how to lock focus and exposure, and how to prevent white disks, blur, vignetting, drift, and color fringes. It also provides practical settings principles, telescope magnification examples, still-versus-video guidance, frame-stacking basics, three real-world workflows, restrained editing recommendations, and a complete field checklist. The central recommendation is to start at low magnification, preserve lunar highlights, capture multiple frames, and keep original files.

Can a Smartphone Photograph the Milky Way?
Yes, a supported smartphone can photograph the Milky Way when the galactic band is above the horizon, the sky is dark and clear, and the phone remains stable during a long or multi-frame capture. This guide explains how to determine whether the Milky Way will be visible, how moonlight and light pollution affect contrast, and how iPhone Night mode, Google Pixel Astrophotography, Samsung Expert RAW, and other Android camera systems differ. Readers receive separate device workflows, a Milky Way readiness scorecard, an exposure-testing table, focus and composition instructions, RAW and processed-file guidance, point-star stacking and storage calculations, a decision tree, real-world scenarios, a complete field checklist, common mistakes, and troubleshooting steps. The article avoids universal camera settings and does not claim that every phone was tested.
Best Smartphone Camera Settings for Night Sky Photography
The best smartphone night-sky settings are not one fixed preset. They depend on the phone’s camera module, computational processing, sky brightness, Moon phase, and target motion. This guide recommends beginning with the main wide camera, rigid tripod support, locked distant focus, an 8–15 second exposure, ISO 800–1600, and fixed white balance around 3,500–4,500 K, then refining those values with structured exposure and ISO ladders. It provides separate starting ranges for the Milky Way, constellations, urban stars, meteor showers, aurora, moonlit landscapes, and star trails. Readers also learn when to use automatic astrophotography mode, Pro mode, RAW, and stacking; how to diagnose blurry stars, washed-out skies, focus failure, and exposure limits; and how to edit and disclose composites responsibly.
Explore More Topics
Dedicated Astronomy Camera vs Regular Camera: What Is the Difference?
A dedicated astronomy camera is designed for telescope imaging through astronomy software and may provide regulated cooling, high-frame-rate readout, monochrome capture, filter-wheel integration, and FITS metadata. A regular DSLR or mirrorless camera is a self-contained general-purpose camera with a screen, battery, memory card, native lenses, autofocus, and daytime usefulness. This guide explains why neither category is universally better. It compares cooled deep-sky cameras, uncooled planetary cameras, guide cameras, monochrome and one-shot-color sensors, regular cameras, and specialized astrophotography DSLRs. Readers learn how cooling, dark current, H-alpha response, UV/IR filtering, sensor size, pixel scale, back focus, software, power, calibration, frame rate, and total system cost affect the decision. The article also includes calculation examples, use-case recommendations, a five-question selection process, a buying checklist, common mistakes, troubleshooting, and practical next steps.
How to Choose a Camera for Astrophotography
Choosing an astrophotography camera starts with the target, optical system, and workflow rather than megapixels or sensor size alone. This guide compares mirrorless and DSLR bodies, cooled one-shot-color cameras, cooled monochrome cameras, planetary cameras, and astronomy-modified models. Readers learn how sensor dimensions affect field of view, how pixel size and focal length determine image scale, and how cooling, quantum efficiency, read noise, full-well capacity, dynamic range, and frame rate should be interpreted. It also provides a color-versus-monochrome comparison, telescope compatibility and back-focus checks, software and driver requirements, a total-system-cost framework, five practical scenarios, troubleshooting, and a complete purchase checklist. The central recommendation is to choose the camera that fits the target, corrected image circle, mount, software, power system, processing workflow, and complete budget.
Best Focal Lengths for Milky Way Photography
For most untracked Milky Way landscapes, a 14–24mm full-frame-equivalent view offers the best balance of sky coverage, galactic scale, foreground context, and shutter-time tolerance. Wider 12–16mm views suit dramatic foregrounds and a large Milky Way arch, while 28–35mm makes the galactic center more prominent. Focal lengths of 40–50mm or longer are better for panoramas, stacking, or tracked high-detail images. This guide converts the recommendations for full-frame, 1.5× APS-C, 1.6× Canon APS-C, and Micro Four Thirds cameras. It explains shutter-time tradeoffs, crop-factor calculations, aperture and corner-performance limits, prime-versus-zoom choices, panorama planning, and tracker use. Readers also receive a three-question lens-selection method, real-world scenarios, a step-by-step lens test, a buying checklist, common mistakes, troubleshooting guidance, and practical recommendations without unsupported “best lens” claims.